A winning run requires more than just teamwork between jockey and horse. It takes a solid support system to keep a horse at the top of its game, and a key contributor to the team is a good farrier. Numerous opinions and various terms enter the equation whenever the topic of horse shoeing comes up—natural balance shoes, hot, cold, corrective shoeing, to name a few.
“Shoeing has been around since medieval times, allowing horsemen to use their horses without their feet cracking or stone bruising. A good, clean shoe job also keeps the foot sound,” farrier T.J. Kraft said.
A North Dakota native, Kraft has been studying horses and horsemanship most of his life. He got his horseshoeing start at the Oklahoma Horseshoeing School in Purcell, Oklahoma. After he completed his education, he studied behind farriers Dick Yates and Bill Clymer of Pueblo, Colorado. His passion to study horses from a variety of performance disciplines always led him back to the basics.
“A lot of people want to fix something on a horse’s foot that doesn’t need to be fixed. Keeping it simple, the foot level and correct when it comes to shoeing is something to keep in mind,” Kraft said.
Preparing the Hoof
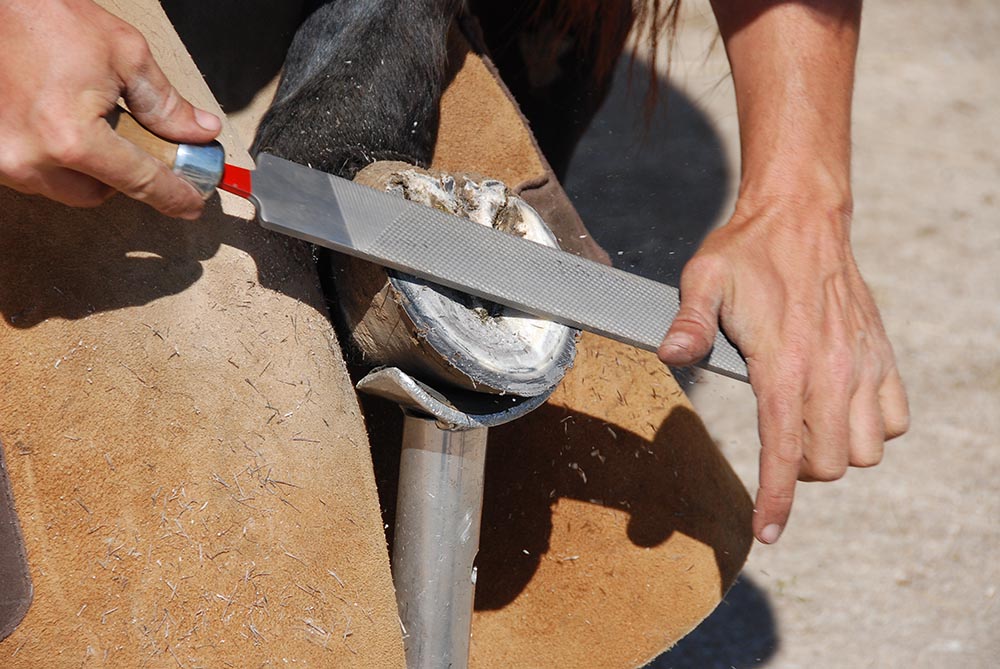
A properly trained farrier recognizes the importance of trimming or rasping the foot to achieve symmetry, with equal distance from hairline to ground all the way around the hoof. This makes the foot level from the sides to the bottom of the foot.
“A properly leveled foot will almost act like a stamp in the ground, leaving a clean mark,” Kraft said. “Studying the angle of a horse’s foot is also a crucial part of a proper shoe job.”
With the horse standing on level ground, Kraft looks for the cannon bone to follow straight down to the widest part of the foot, which is the ideal break-over point.
The heels and quarters of the foot should be nice and round. Kraft emphasized that what is done to one hoof should be done to the other. Some horses can be stood up at a steeper angle than others, depending upon where the cannon bone is in reference to the hoof. With a horse standing straight on level ground, look down the withers to the point of shoulder and then straight down the leg, imagining a line that falls to the widest part of the foot. Kraft uses this visualization to keep his shoeing consistent.
“Some horses have natural, beautiful angles that make for an easy set, but they’re not all the same,” Kraft said. “Getting the angles to what feels good to the rider and what feels good to each particular horse sometimes takes a couple trims or shoe jobs or as much as a year to get the desired effect.”
Kraft says an effective and correct trim should produce a concave sole, which aides in keeping the bars and frog cleaned out to promote healthy growth. It also makes the foot easy to clean and prevents bruising by taking the sole pressure off the ground. Kraft encourages heel growth and therefore avoids taking too much off the heels—the bulbs of the feet should not hit the ground.
Shaping Shoes

When shaping a shoe, Kraft again emphasizes that both front feet have the exact same shape. He places the shoes together to make sure that they are lined up perfectly. He also picks up the foot and eyes it to see if the surface is level. Watch your farrier place the shoe on the anvil to see how level it is. Front shoes tend to need a bit more rounding of the toe than back shoes. Considering the fact that a horse’s heels expand upon impact with the ground, Kraft allows a dime- to nickel-sized rim of shoe around the heels of the foot.
Nail Placement
Correct placement of the nails through the shoe and into the foot is essential. Properly schooled farriers place the nails safely and correctly.
“Approximately 3/4 of an inch up from the shoe is a good rule of thumb,” Kraft said.
If the nails are placed too low, the shoe will more than likely come off. Kraft says he aims to keep the nails flowing with the angle of the foot by following the adage, “Drive them high and clench them clean.”
Using the back three nail holes whenever possible is a trait of good farriers.
“Getting close to the heel isn’t always possible, but it’s what we aim for when putting in the nails,” Kraft said. “The hoof wall is thinner the closer you get to the heels, making nail placement here a bit more challenging. It takes more caution, but in my experience, placing the nails in the back three nail holes makes things more level and helps seal the shoe to create a better fit.”
Clean, smooth clenches of the nails are crucial to a good set.
“A reputable farrier will use a clenching block to place the nails. Clenching shouldn’t be a forceful event; they should bend over smoothly. The tops of the clenches should be rasped, leaving the foot smooth and clean,” Kraft said.

Kraft stresses that if the horse is shod properly, you shouldn’t have to give a horse time off after a shoeing. Generally speaking, one should still be able to barely see the lines of the sole from the previous shoeing. Clean as much sole as possible, leaving what farriers call “road maps,” or the faint lines in the sole. There is a fine line to walk when taking sole out to achieve the concave effect without cutting the live sole or leaving it susceptible to stone bruising.
Summing It Up
Kraft describes a good basic shoeing job as clean, round, smooth and conformed. The medial side should match the lateral side, with no jagged points. The clenches should be clean and level with the foot. When travelling, the horse should be sure-footed, land level and stride out comfortably.
“I have never seen a perfect shoe job; nothing’s perfect. However, we can strive to always make the foot better, smoother and change what we need. All horses are different, so be careful to avoid entirely changing a horses stride,” Kraft said.
When it comes to shoeing, opinions run the gamut. However, a basic, clean job producing a sound horse that doesn’t pull shoes is a smart place to start. Adjustments and studying techniques are all within our reach, so seek advice from reputable veterinarians, farriers and trainers when in doubt.
Hoof Anatomy
Toe: The front part of the hoof, the length of which is directly related to the break-over.
Quarters: The portion of the hoof between the toe and the heel.
Heel: The back portion of the foot.
Sole: The bottom of the foot that protects the inner parts of the hoof.
Bars: A continuation of the hoof wall located next to the frog.
Frog: A wedge-shaped structure positioned between the bars.
Make it a Positive Experience for Horse and Farrier
- Be present to hold the horse for your farrier.
- Have your horses caught and legs cleaned off in advance of the shoeing appointment.
- Pick your horse’s feet out in advance.
- Spray for flies and provide a clean and level surface on which your farrier can do his work safely.
- Do not treat the horse’s hooves with sticky hoof dressing prior to a shoeing.
- Prepare your horse by regularly handling and picking up its feet.
- Work with your farrier to set up regularly scheduled appointments well in advance.
Tisa Kraft is an avid barrel racer and aspiring writer based out of Texas. Email comments on this article to [email protected].